Table of Contents
Introduction To Plumbing For A Fridge
When designing your dream kitchen (or even improving your existing one), convenience and efficiency are usually at the top of your wish list. Among many modern appliances, a plumbed fridge (aka a fridge with a water line) is an excellent addition that not only offers crisp, filtered water on demand but also automatically replenishes your ice supply. In this article, we’ll dive into the world of fridge plumbing, specifically discussing what it involves, how to install it, and the various benefits and drawbacks you should consider.
What is a Plumbed Fridge?
A plumbed fridge is an upgrade from traditional fridges. It’s connected to your home’s water supply, providing a constant source of fresh, filtered water and ice. The term plumbing for fridge refers to this connection process.
Benefits of a Plumbed Fridge
- Convenience: Enjoy chilled water and ice at your fingertips without having to refill the water tank manually.
- Space saving: You can say goodbye to water pitchers and ice trays, freeing up valuable space.
- Improved taste: Filtered water from your plumbed fridge can often taste better than tap water.
- Cost-effective: You might save money in the long run as you won’t have to buy bottled water or ice regularly.
Drawbacks of a Plumbed Fridge
- Installation complexity: Plumbing a fridge often requires professional help, especially if you’re uncomfortable with DIY tasks.
- Maintenance: Regular filter changes are necessary to ensure the water quality.
- Potential for leaks: Like any appliance connected to your water supply, there’s a chance of leakage which could cause water damage.
Step-by-Step Guide to Plumbing Your Fridge
Here is an easy-to-follow guide for plumbing your fridge. Remember, if you’re uncomfortable with any step, it’s best to consult a professional plumber.
1. Gathering the Necessary Tools and Materials
Before you start, make sure you have the following items:
- Adjustable wrench
- PEX or copper tubing
- Compression fittings
- Drill
- Pipe cutter
- Teflon tape
2. Locate Your Water Source
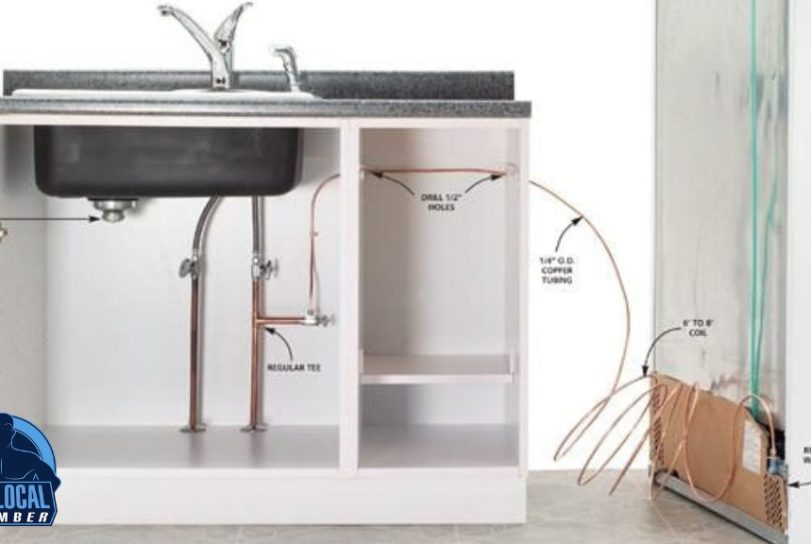
Identify the closest cold water supply line to your fridge, usually found under the sink or in the basement.
3. Install the Water Line
Drill a hole behind the fridge and through the floor or wall, as required. Run your tubing from the water supply line to the fridge, ensuring the tubing is long enough to pull the fridge out for cleaning.
4. Connect the Water Supply
Turn off the water supply. Using a pipe cutter, make a cut in your water supply line. Then install a tee fitting by following the product’s instructions. Attach the other end of your tubing to this fitting.
5. Connect to the Fridge
Locate the fridge’s water supply connection. Wrap this connection point with Teflon tape, then connect your tubing using a compression nut. Make sure it’s secure but avoid overtightening.
6. Check for Leaks
Turn on the water supply and check all connections for leaks. If you notice any water dripping, turn off the water and tighten the connections.
7. Enjoy Your Plumbed Fridge
Your fridge is now ready to dispense fresh, chilled water and make ice. Please note that it may take a few hours for the fridge to start making ice.
Conclusion
A plumbed fridge is a fantastic addition to any kitchen, offering convenience and functionality. Although the installation might be challenging for some, the benefits outweigh the drawbacks, especially if you value convenience and efficiency. Remember, professional help is just a call away if you’re uncomfortable with DIY installation. Stay hydrated with your newly installed plumbed fridge!
We would highly recommend hiring a professional to prevent potential leaks that can be caused from the fridge installation (often these are detected far too late in the piece and can cause unnecessary damage to your property).
To speak with a professional about plumbing in your fridge just give us a call anytime!

